
Creamy Butterscotch Pie with Toasted Meringue
Get Ready to Go Goo-Goo for Gooey: Introducing the Butterscotch Pie of Your Dreams!
Alright, pie fanatics, gather 'round! Forget everything you thought you knew about "dessert." Today, we're not just making a pie; we're crafting an edible symphony of sticky, sweet, salty, and utterly unforgettable flavors that will make your taste buds do a happy dance.
Meet the undisputed champion of comfort and class: Butterscotch Pie with Toasted French Meringue and a Drizzle of Salted Caramel!
This isn't just a pie; it's an experience. It’s the kind of dessert that makes you close your eyes, hum a little tune, and consider marrying the person who baked it. (Don't worry, we won't tell.)
The Anatomy of an Epic Pie Adventure:
We're talking about three layers of pure, unadulterated bliss, each playing a crucial role in your impending dessert coma:
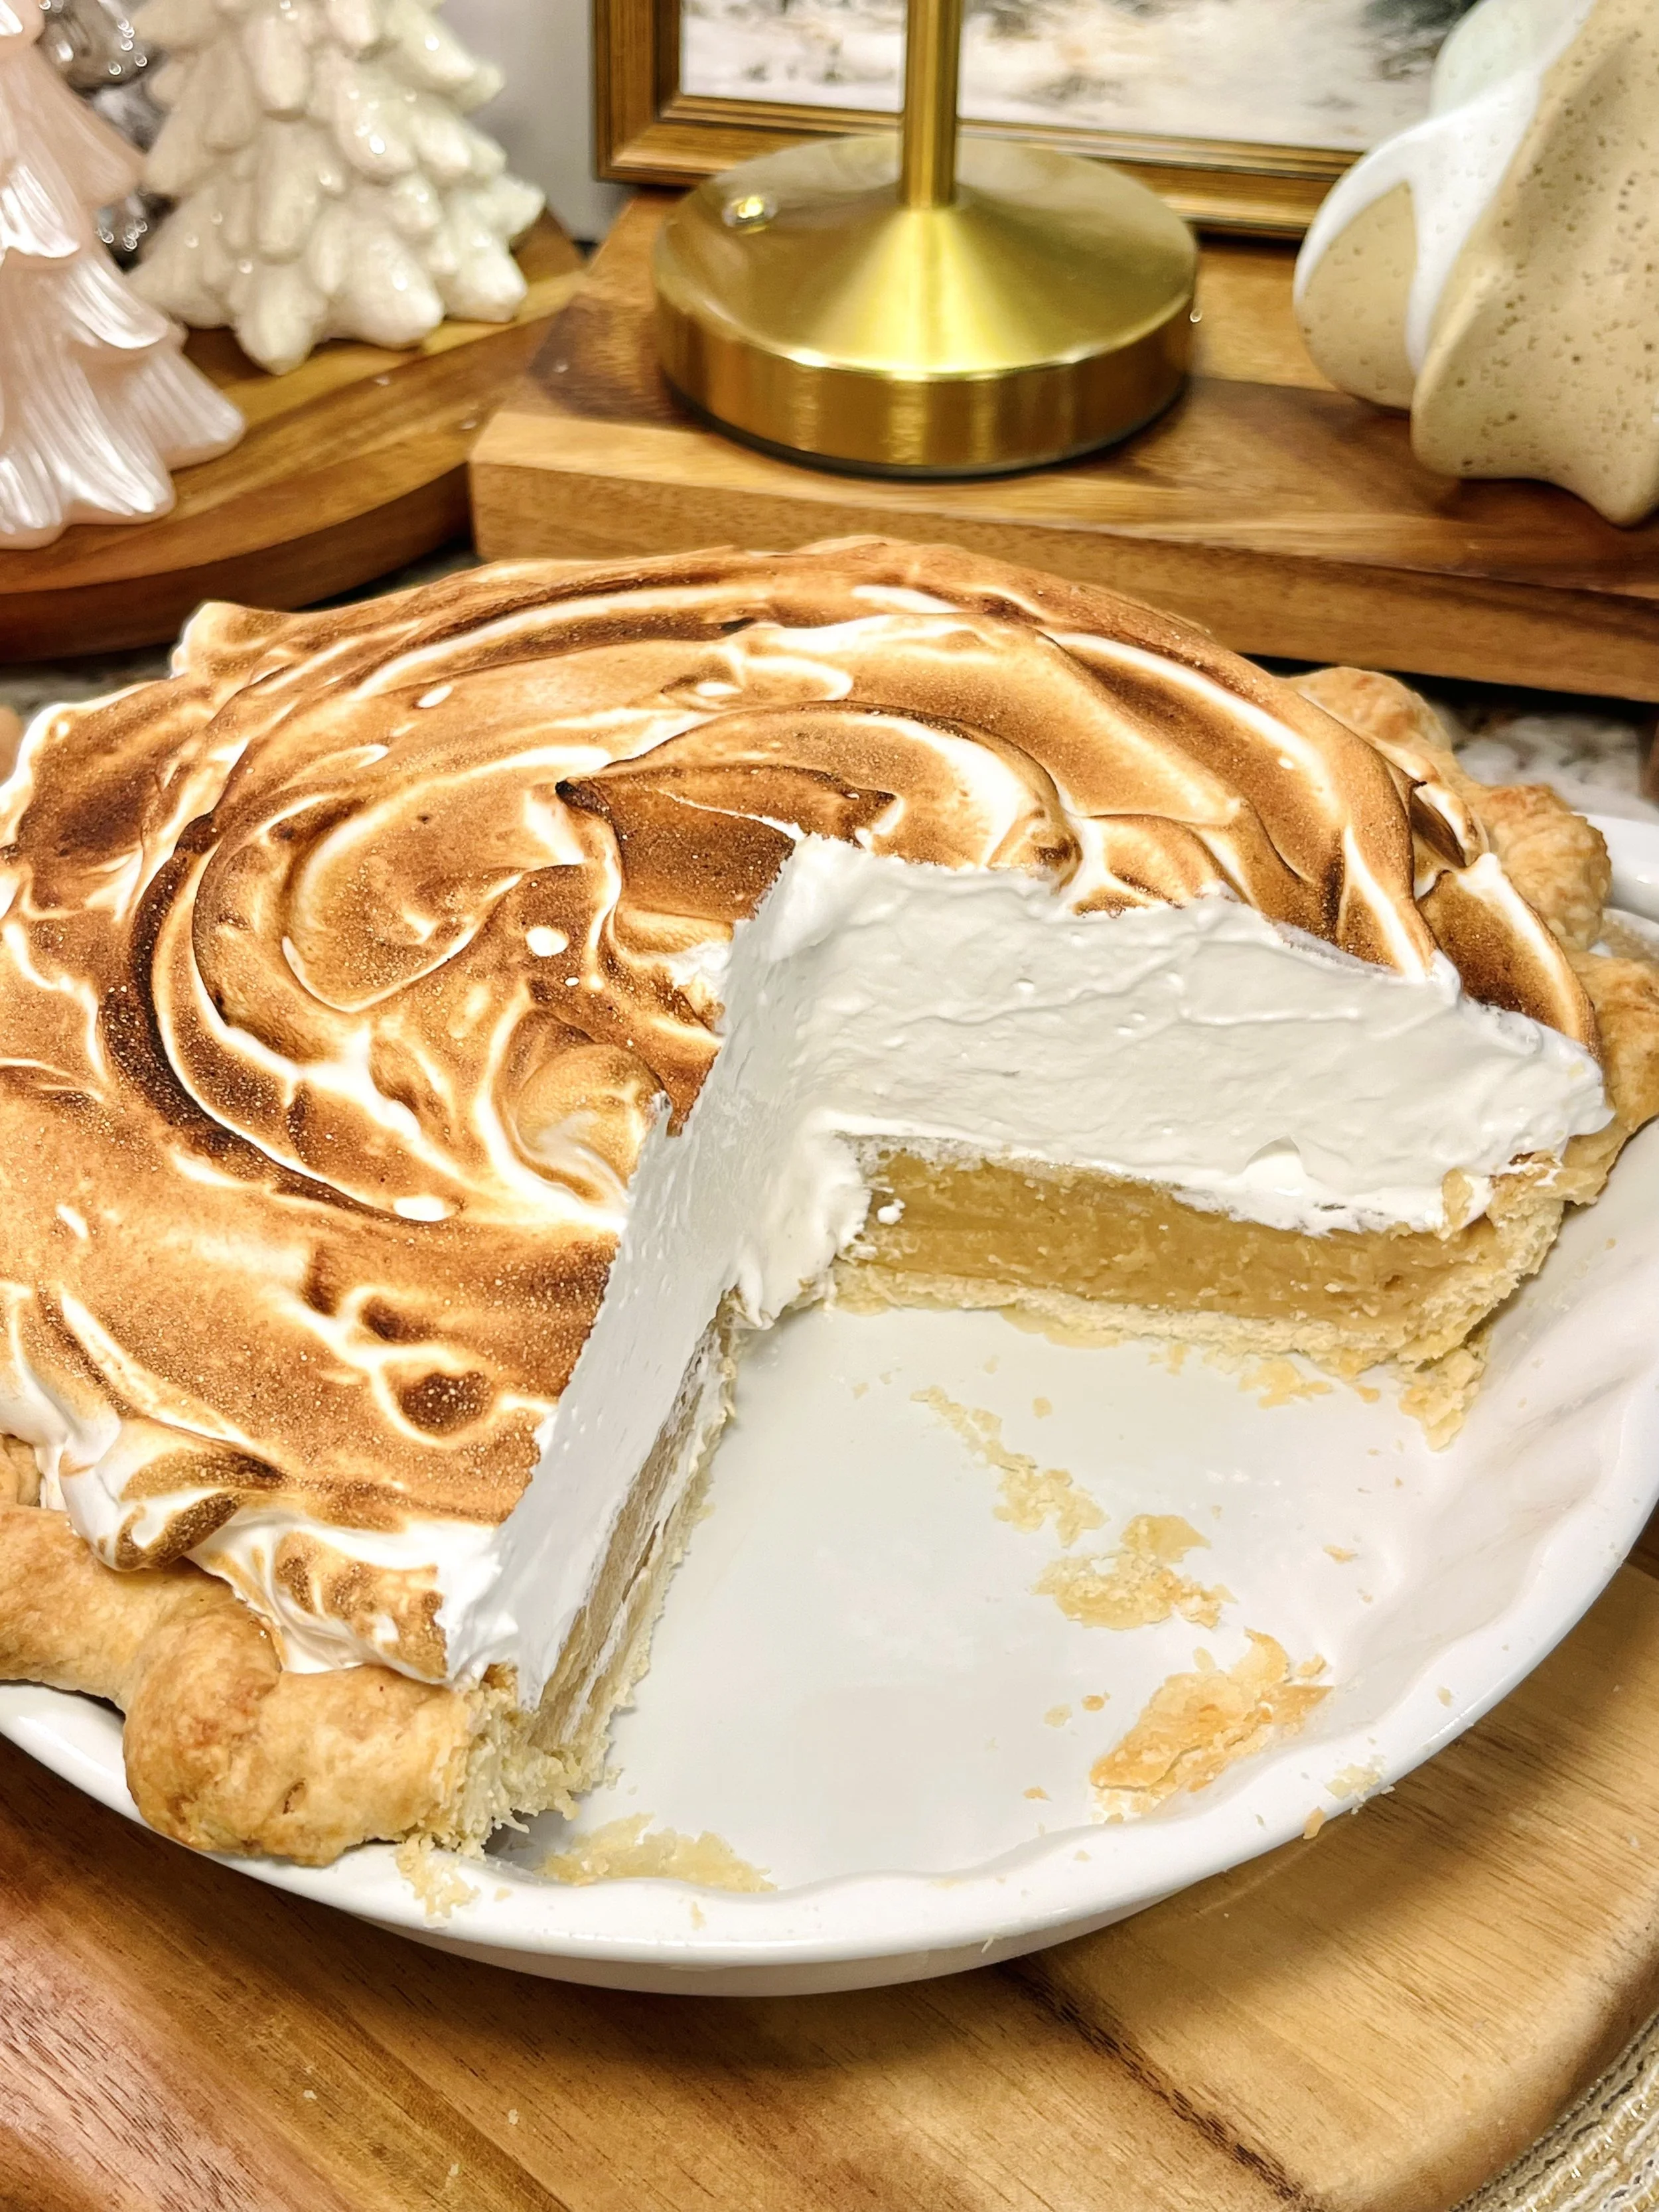
The Butterscotch Dream (The Gooey Heart!)
Oh, butterscotch! That deep, toffee-like, caramel-y flavor that instantly transports you back to childhood, but with a grown-up sophistication. Our filling is:
Rich & Velvety: Think silky smooth custard, thick enough to hold its shape but melt-in-your-mouth creamy.
Deeply Flavorful: Made with brown sugar, butter, and a hint of vanilla, it sings with that nostalgic, comforting butterscotch note. It’s the kind of filling you want to swim in.
Made to Perfection: Nestled in a flaky, golden pie crust, this filling sets up beautifully, creating the perfect foundation for our grand toppings.
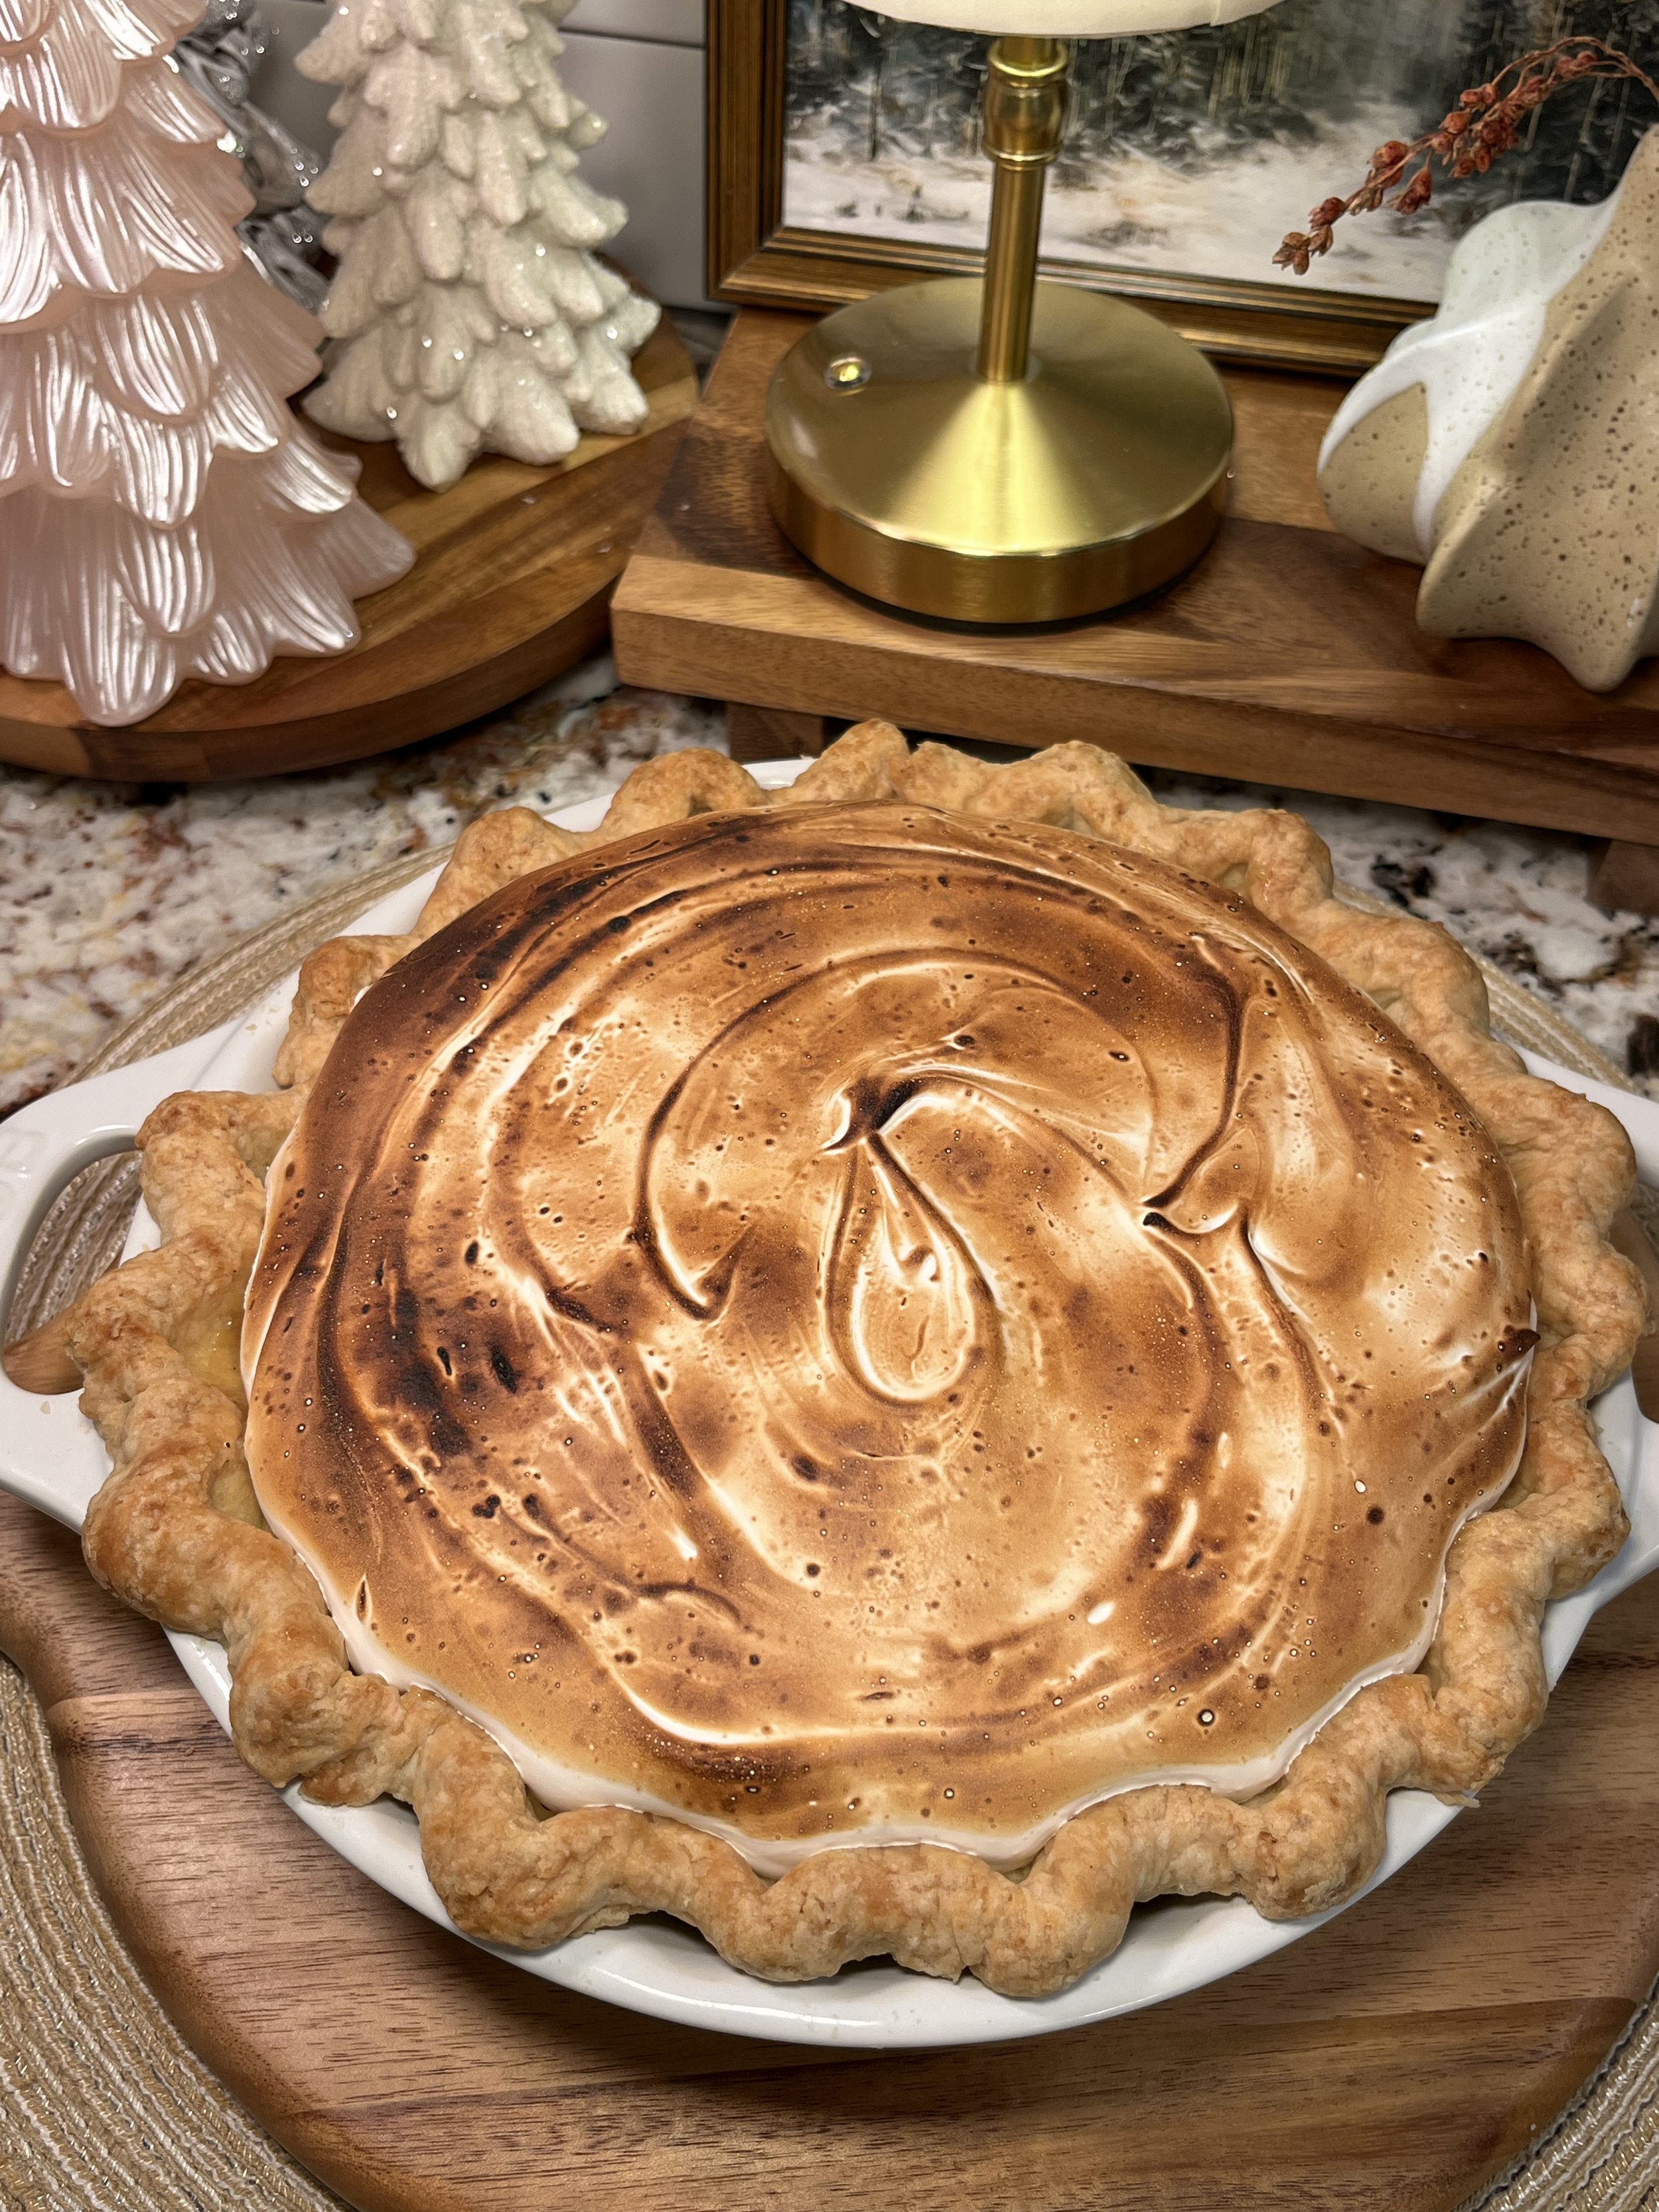
The Toasted French Meringue Crown (The Cloud of Sweetness!)
Forget boring whipped cream! We're elevating this pie to stratospheric levels with a towering, fluffy cloud of French Meringue.
Light as Air: Whipped egg whites, sugar, and a touch of vanilla create a pristine white mountain that's sweet, delicate, and utterly divine.
The Golden Kiss: The real magic happens when you toast it! Whether under a broiler or with a kitchen torch, those delicate peaks get beautifully caramelized and golden-brown. It adds a subtle smoky note and a delightful textural contrast—crisp on the outside, pillowy soft within. It's like eating a sweet, toasted cloud.
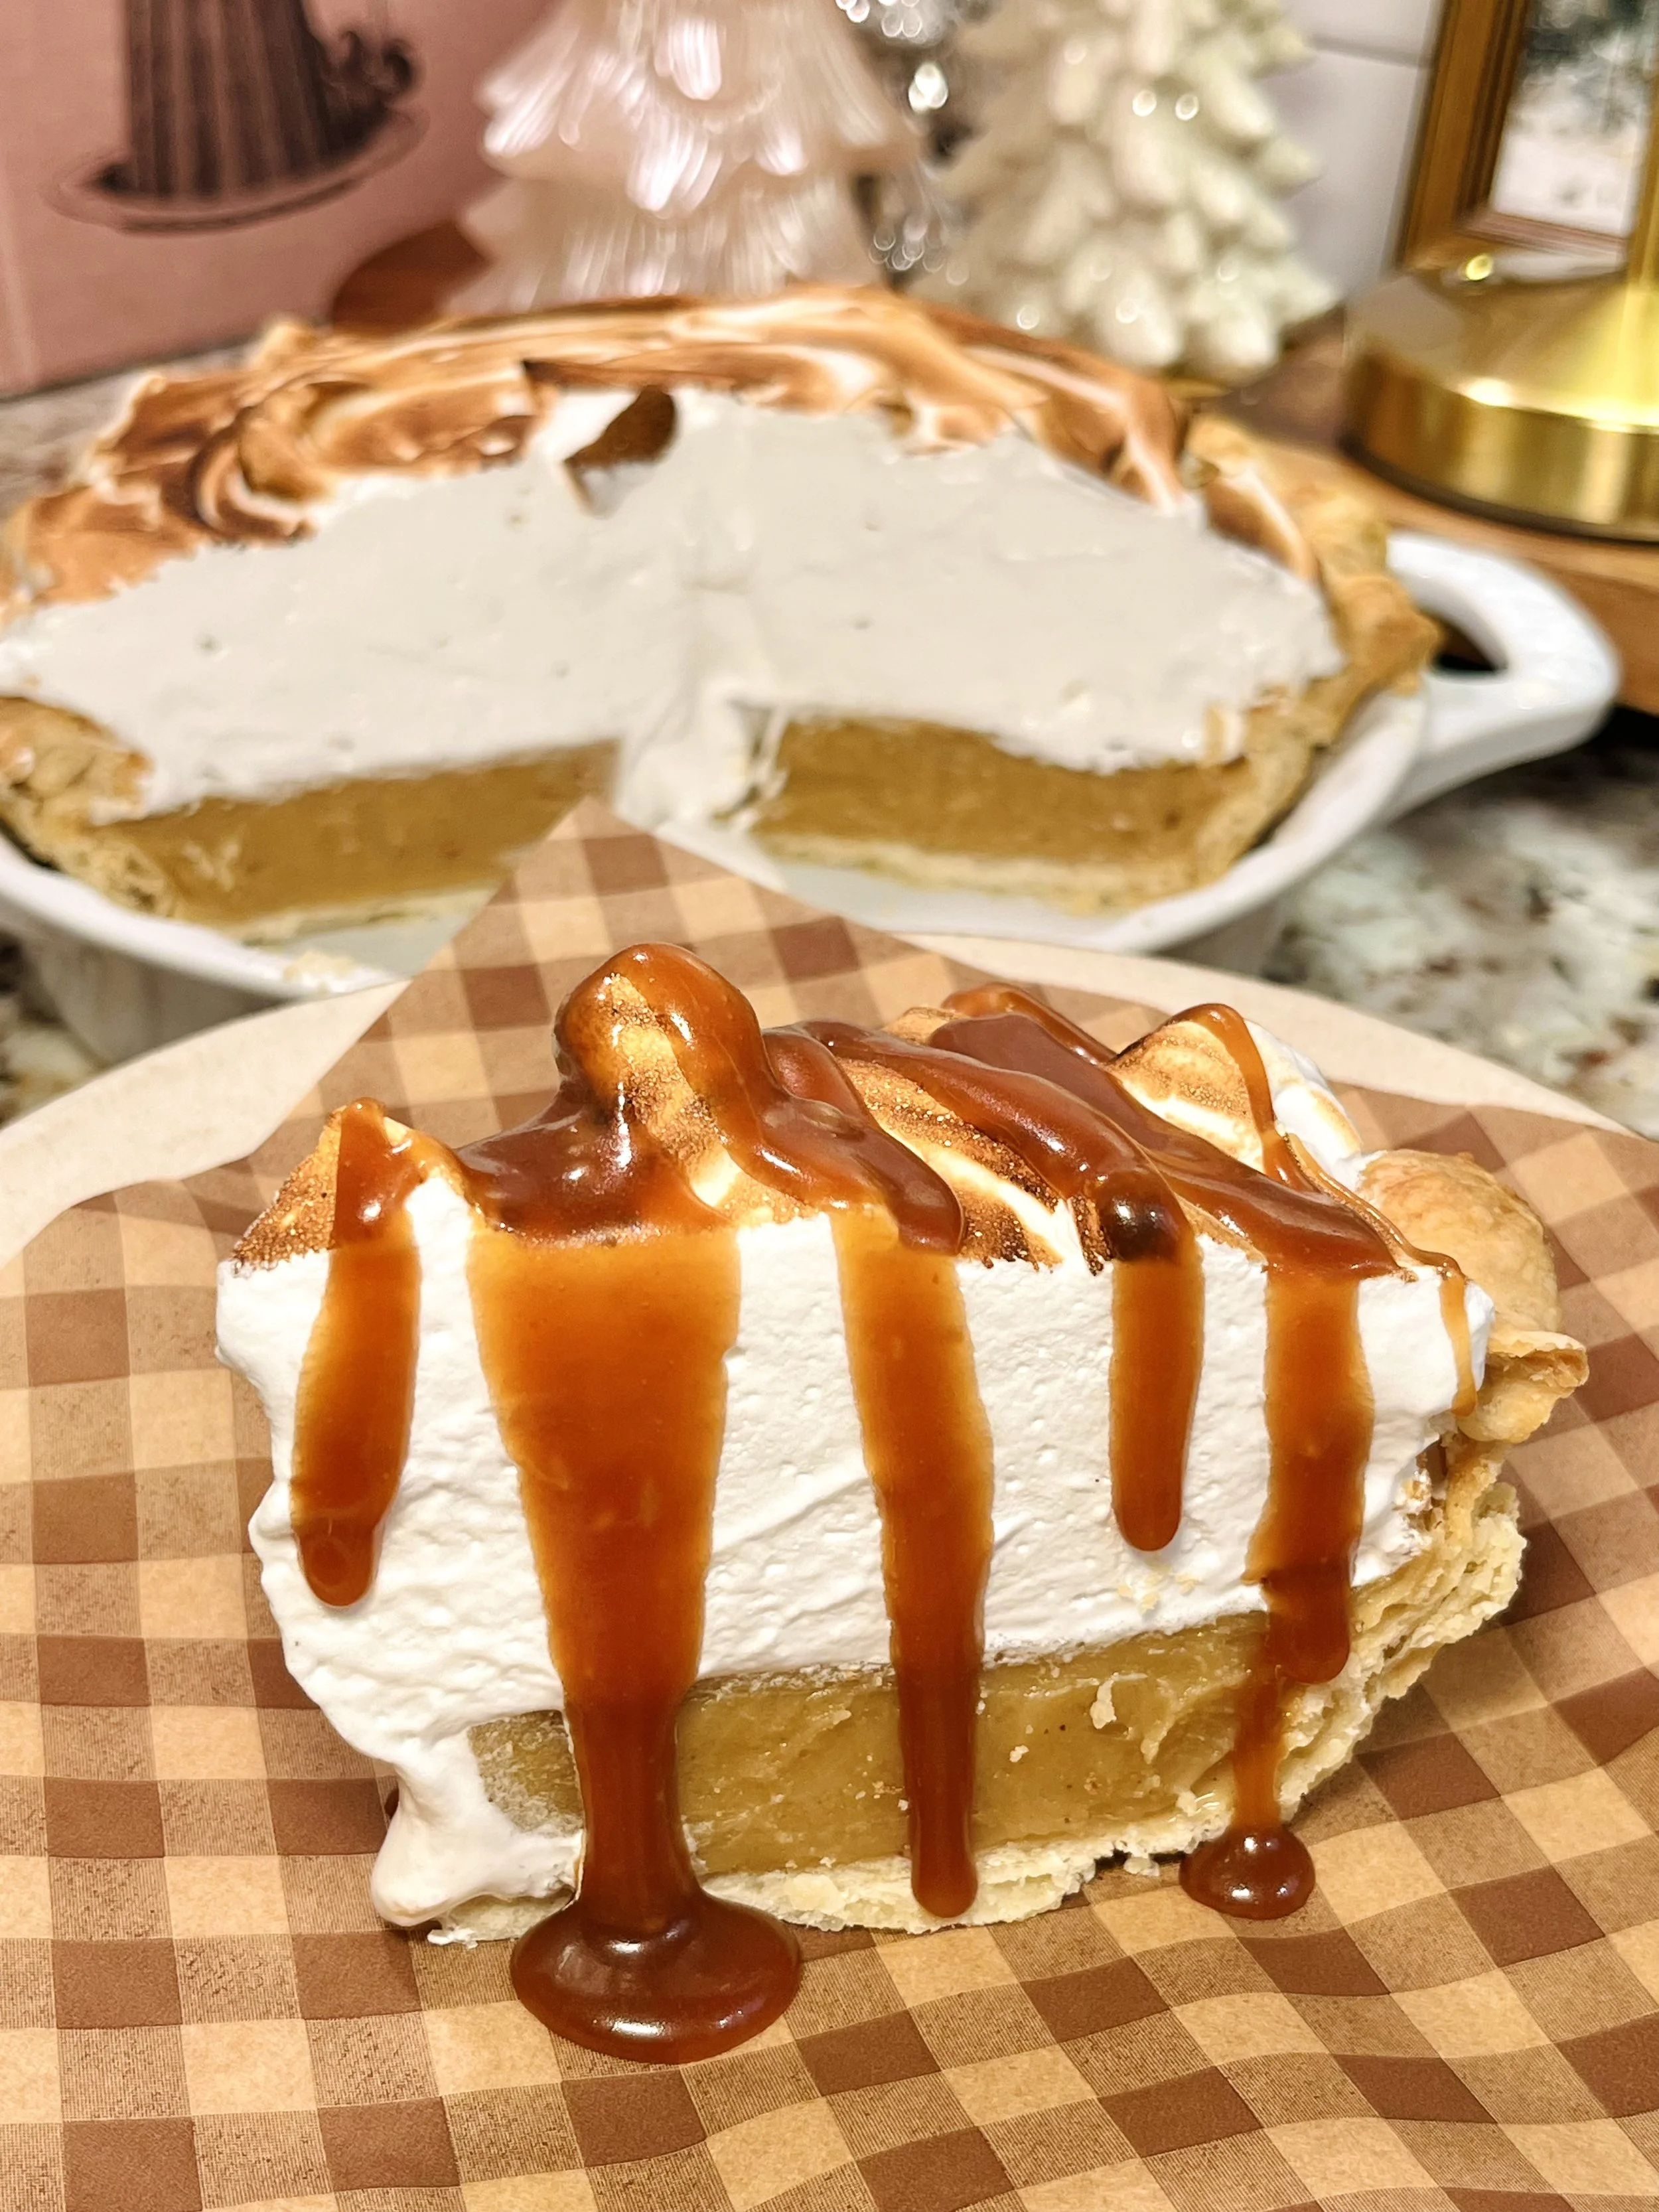
The Salted Caramel Drizzle (The Final Flourish!)
Just when you thought it couldn't get any better, we introduce the mic drop: Salted Caramel.
Sweet & Salty Symphony: This adds that irresistible salty-sweet punch that cuts through the richness of the butterscotch and the sweetness of the meringue. It's the flavor profile that keeps you coming back for "just one more bite."
Liquid Gold: Drizzled generously over the toasted meringue, it cascades down the sides, hinting at the deliciousness within. It's not just a topping; it's a statement.
Why This Pie is Your New Dessert Superpower:
The "Wow" Factor: This pie doesn't just sit on the dessert table; it struts. It's visually stunning, from its golden crust to its sky-high meringue and glistening caramel.
Flavor Harmony: Each element supports the others, creating a perfectly balanced bite where every flavor gets its moment to shine. It's a sweet, salty, creamy, crunchy, toasty dream!
Pure Indulgence: This is the ultimate treat yourself dessert. It's rich, comforting, and utterly luxurious without being overly complicated to make.
So, clear your dessert schedule, preheat your ovens, and get ready to make a pie that will earn you legendary status among your friends and family. This Butterscotch Pie with Toasted French Meringue and Salted Caramel isn't just a recipe; it's an invitation to pure, unadulterated joy. Go forth and get gooey!
Creamy Butterscotch Pie with Toasted Meringue
Created by Sue Mun
makes one 9 inch pie
INGREDIENTS
For the Pie Crust:
190g ap flour
1/2 tsp salt
1 tbsp sugar
110g butter
60g water
For the Butterscotch Pie Filling:
40g unsalted butter
290g brown sugar
160g heavy cream
270g whole milk #1
4 egg yolks
70g cornstarch
55g whole milk #2
pinch of salt
2 tsp vanilla extract
For the French Meringue:
105g fresh egg whites
1/4 teaspoon Cream of tartar
140g Granulated sugar
pinch of salt
1 teaspoon vanilla extract
INSTRUCTIONS
Make the pie crust:
In a large bowl, whisk together the all purpose flour, salt, and sugar.
Add the cold butter cubes to the flour mixture. Use a pastry blender, two knives, or your fingertips to cut the butter into the flour. Mix until the mixture resembles coarse crumbs, with some pieces of butter remaining in the size of small peas. These pieces create flakiness.
Pour in the cold water. Use a spatula or your hands to gently toss and stir the mixture until it just starts to come together. Stop mixing the moment it holds together when squeezed. Do not overwork it.
Turn the dough onto a lightly floured surface, gather it gently into a ball, and flatten it into a thick disc. Wrap the disc tightly in plastic wrap. Refrigerate the dough for at least 2 hours before rolling. This allows the gluten to relax, ensuring a tender and flaky crust.
Shape the pie dough:
When the pie dough has chilled, roll it out on a lightly floured work surface until it is about 1/8-inch thick and measures approximately 12 to 13 inches in diameter. This extra 3 to 4 inches of overhang is necessary to fit the dish and create the crimped edge.
Loosely roll the dough up onto the rolling pin. Lift the rolling pin and center it over your 9-inch pie dish. Gently unroll the dough over the dish, letting it drape loosely over the sides. Gently lift the edges of the dough and let it drop naturally down into the dish, ensuring the bottom of the dough makes full contact with the bottom of the dish and the corners. Use the sides of your fingers to gently press the dough into the contour of the dish, making sure it settles tightly into the corners where the bottom meets the sides. Fold the overhanging dough underneath itself, creating a thick, uniform rim that sits right on the edge of the pie dish.
Now, secure and decorate the edge. Place your thumb and index finger on the outside edge of the crust. Use the index finger of your other hand to press the dough inward between your thumb and finger, creating a decorative wave or flute. Move around the entire circumference of the pie.
Place the finished, lined pie dish back into the refrigerator (or freezer) for at least 20 minutes before adding your filling or baking (if blind-baking). This final chill locks the butter and relaxes the gluten one last time, ensuring a maximum flaky crust that holds its shape.
Preheat your oven to 375F while you wait for the pie crust to firm up in the fridge.
Par-Bake the pie shell: When ready, place a piece of parchment down onto the bottom of the pie shell to completely cover it. Fill it with pie weights, dried beans, or rice. Bake the pie shell for 20 minutes. Take the pie shell out of the oven and remove the pie weights. Then place it back into the oven to bake again for about 20 more minutes or until the shell looks fully baked and is golden brown.
Set the pie shell aside to cool off while you work on the butterscotch filling. The pie shell can be par-baked a day ahead to save time as well.
Make the butterscotch filling:
Place a fine-mesh strainer over a large bowl. You will be using this later and it will be a lot easier for you to have it ready. Set this aside.
In a medium pot, melt the butter over medium high heat and allow the butter to brown.
Once the butter has browned, add in the brown sugar and heavy cream and stir until it begins to boil. Allow this mixture to continue to simmer for about 5 minutes or until thickened.
Pour in the milk #1 into the saucepan and whisk to combine. Set this hot milk mixture aside.
Meanwhile, in a medium bowl, whisk together the milk #2, cornstarch, egg yolks, vanilla and salt until smooth.
Carefully pour in the hot milk mixture from earlier into the egg mixture while whisking at the same time. Pour the liquid back into the pot and place the pot back on the stove and cook over low heat while stirring constantly.
Continue to cook until the mixture thickens to a very thick pudding-like consistency and it starts to look like melted butterscotch candy.
When finished cooking, pour the butterscotch filling into the mesh strainer over the bowl. Use a rubber spatula to push and press the filling through the strainer. You need to do this so you are able to remove any cooked eggs that might have been created. Doing so, will result is a smoother texture of the pie.
Pour the butterscotch filling into the baked pie crust and smooth out the top.
Cover the pie with plastic wrap. Place in the fridge for at least 6 hours until set (chilling overnight is best).
Serve with French meringue and toast it with a kitchen safe blow torch. Or serve with whipped cream if desired. Drizzle with salted caramel if desired.
To make a French meringue topping:
In a stand mixer fitted with a whisk attachment, pour in the egg whites and start beating the egg whites on medium-low speed.
As soon as the whites become frothy and foamy (about 1 minute), add the cream of tartar and the pinch of salt. The cream of tartar is an acid that helps stabilize the foam.
With the mixer still running, begin adding the granulated sugarvery slowly, about 1 tablespoon at a time. Wait about 15 to 20 seconds between each addition to give the sugar time to dissolve into the egg whites. Do not rush this step—if you add the sugar too quickly, the meringue will become grainy and weep.
Increase the mixer speed to high. Once the stiff peaks are achieved, add the vanilla extract (1 tsp) and mix on low speed for just 15 seconds to incorporate.